
Hey, everyone! Hope you are all doing well.
My family and I have been in self-quarantine since March 13th. We have only been out a handful of times and have only recently started getting take-out. This has been the most I have ever cooked at home IN MY LIFE and I’m glad to get the occasional relief.
Needless to say, my Etsy shop has been closed since we were told to stay home because there was no way I was going to go to the post office. However, we (my husband and I) have just experimented with USPS home pickup and I have decided to reopen the shop! Yay!
In addition to reopening the shop, I wanted to release a few patterns on here as well. I know I mentioned wanting to do this before and I see that the last ones I shared were my Mini Meat Boy & Bandage Girl patterns – all the way back in July of last year! Wow! I’d say that I’m surprised I haven’t posted here in such a long time but, really, it’s not that shocking – I can never keep up with this blog! In addition to everything else that has been going on, I once again kicked crochet to the curb and rarely picked up a hook. I only started again a week or two ago but it has still been fairly limited.
A few days ago, I was asked if I would be willing to share some of my Tamagotchi patterns. As they were ones I was planning on sharing at some point anyway, I said I would look into it. I knew that I would need to rewrite some of them because many of my patterns are just numbers and tallies.
I wasn’t wrong! With my Maskutchi pattern that I am sharing today, I actually had to rewrite (and test) an entire section of the body! With my original Maskutchi, I did the entire thing freehand and with the “right side” facing out. (Which is the bad side. Crochet is weird. Whatever.) When I rewrote the pattern the first time, I started making it again with the “wrong side” out since it looks cleaner, but realized that Maskutchi’s tush was now going the other way! I adjusted the pattern to get the correct stitch counts but never adjusted it to get the tush pointed in the right direction (lazy me). As I was reworking it this time around (so I could take photos, etc), I knew I was going to have to flip the tush and rewrite the bottom portion entirely.
I’ve included a few pictures in the pattern below which, hopefully, help guide you through the pattern. If you have any questions about it, please let me know and I will try to add some other pictures to help explain it. Also, let me know if you see any typos in the pattern. 😉
I hope you enjoy this pattern and please tag me in any photos or posts you make! Want to make a different Tamagotchi? You can also find my Tarakotchi pattern here.
Have a good week!
Rachel
Final Note: As always, this pattern is for personal use only and should not be sold as your own. Please give credit where credit is due! 🙂 Thank you!
———
Let’s get started!
Maskutchi

Some notes:
- Crochet Level: Easy/Intermediate
- Made in the round
- Terms
- sc – single crochet
- inc/dec – increase/decrease
- FO – Finish off
- Ch – chain
You will need:
- Yarn in Red Heart “Light Blue”, black, and white.
- Hooks in sizes 5.00mm (H) and 4.00mm (G)
- Yarn needle
- Fiberfill/stuffing
- Stitch marker or piece of contrasting yarn
“Ears” (Make 2)
With black yarn, begin with MR.
Row 1: sc 6 – 6
Row 2: inc around – 12
Row 3: (inc, sc 1) around – 18
Row 4: (inc, sc 5) around – 21
Rows 5-6: sc around – 21
FO first ear and set aside. Repeat Rows 1-6 for second ear but do not FO.
Row 7: Connect both ears with 5 sc, place a stitch marker to mark the beginning of the round, and crochet around – 32
Rows 8-9: sc around – 32

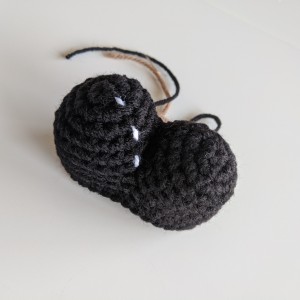


To show contrast: the first ear is grey, the second ear is white, and rows 7-9 are orange.
- Pictures 1-2 show the connecting 5 sc and placing the stitch marker
- Pictures 3-4 show the first row
- Pictures 5-6 show rows 8-9
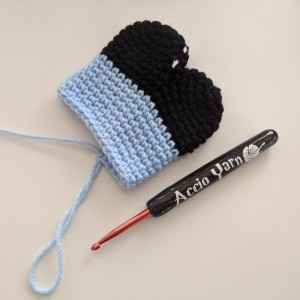
Switch to blue yarn to begin the body.
Row 10-17: sc around – 32
Row 18: sc 25, inc, sc 6 – 33
Row 19: sc 26, inc, sc 6 – 34
Row 20: sc 27, inc, sc 6 – 35
Row 21: sc 28, inc, sc 6 – 36
Row 22: sc 29, inc, sc 6 – 37
Row 23: sc 30, inc, sc 6 – 38
Row 24: sc 31, inc, sc 6 – 39
Row 25: sc 32, inc, sc 6 – 40
Start stuffing if you haven’t already.
Rows 26-28: sc around – 40
Row 29: sc 10, dec, sc 19, dec, sc 7 – 38
Row 30: sc 10, dec, sc 17, dec, sc 7 – 36
Row 31: sc 9, dec 2x, sc 14, dec 2x, sc 5 – 32
Row 32: sc 8, dec 2x, sc 12, dec 2x, sc 4 – 28
Row 33: sc 7, dec 2x, sc 10, dec 2x, sc 3 – 24
Row 34: sc 6, dec 2x, sc 8, dec 2x, sc 2 – 20
FO and sew shut.

Eye Area/Mask
With black yarn and 4mm hook chain 10.
Row 1: sc 8 stitches, 3 sc in last stitch. Continue crocheting along the back side of the starting chain for 7 stitches and 2 sc in last stitch – 20
Row 2: Inc in first stitch, sc 7, inc, sc, inc, sc 7, inc, sc 1 – 24
Row 3: sc, in, sc 8, inc, sc 2, inc, sc 8, inc, sc 1 – 28
FO

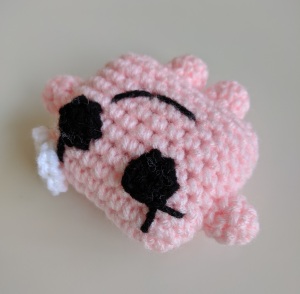
Eyes
In white with 4mm hook, make MR.
Row 1: sc 6 – 6
Row 2: Inc around – 12
FO, embroider pupils, and attach to black section.
Attach finished mask to the body.

Feet (Make 2)
In black with 5mm hook:
Attach yarn to bottom of body with a slip stitch (Maskutchi lying face up).

Ch 10.
Slip stitch back 4 sts, ch 4, sl st back 4, then sl st back up leg.
Slip stitch once more at the beginning of the chain and fasten off.

And you’re finished!

Tag me on Instagram @pleasantplushies I’d love to see how yours turned out!
Visit me on Ravelry!


