Hello! Hope y’all are having a nice weekend so far!
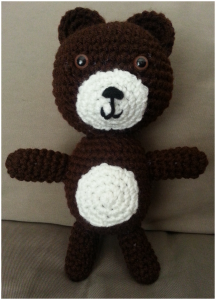
Today, I have a special treat for you. Well, I like to consider it a treat… Yesterday, I made a new amigurumi that I want to share with you.

Hello there!
His name is Sampson. He’s a bear. But he wasn’t always going to be a bear!
When I began working on this project, he was meant to be a rabbit. I was going to make an Animal Crossing character named O’Hare (one of my favorites) but after I finished off the main part of the head and an arm I realized that the color was wrong – it was much too dark! (I might as well mention that I was working on it in a semi-dark room) So, I decided to change a rabbit to a bear. If you have ever looked at my shop before, you may have noticed that I mostly make video game related items. Sampson was a nice little change because I could make him look any way that I wanted and I didn’t have to continuously stare at a photo to make sure the details were accurate.
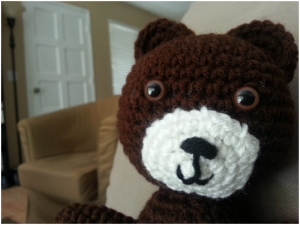
Personally, I think he’s pretty adorable. At least now he is. When I first finished him he looked like this:
Not as cute. Each time I looked at him it bothered me because I knew that it looked terrible. Thus, the first thing I did this morning when I woke up was to cut off those hideous eyes and try to attach some safety eyes. I don’t know if you have ever tried to attach those eyes to an already finished item but let me tell you… it is a real hassle. There is not quite enough space between the stitches to squeeze the back clasp of the eye (I call it a washer because it looks kind of like one) back into the head so I had to stretch the stitches out a bit. Luckily, I was able to get it back in there without too much stretching which means it doesn’t look like there are holes in it! Yay!
If you would like to make your own Sampson, you will need:
- Yarn in dark brown, off-white, and black.
- Safety eyes or buttons
- Size 5.00mm (H) hook
- I like the hook from this Boye set
- Yarn needle
- Polyester Fiberfill
Head
With dark brown make a Magic Ring (MR).
Row 1: Single crochet (sc) 6 – 6
Row 2: Increase (inc) around – 12
Row 3: (Inc, sc 1) around – 18
Row 4: (Inc, sc 2) around – 24
Row 5: (Inc, sc 3) around – 30
Row 6: (Inc, sc 4) around – 36
Row 7: (Inc, sc 5) around – 42
Rows 8-14: Sc around
Note: If attaching safety eyes, place them on row 10 about 5-6 stitches apart. Begin stuffing as you go.
Row 15: (Decrease, sc 5) around – 36
Row 16: (Dec, sc 4) around – 30
Row 17: (Dec, sc 3) around – 24
Row 18: (Dec, sc 2) around – 18
Row 19: (Dec, sc 1) around – 12
Row 20: Decrease around – 6
Finish stuffing, finish off (FO), and sew closed.
Body
With dark brown make a MR.
Row 1: Sc 6 – 6
Row 2: Inc around – 12
Row 3: (Inc, sc 1) around – 18
Row 4: (Inc, sc 2) around – 24
Row 5: (Inc, sc 3) around – 30
Rows 6-14: Sc around
Begin stuffing as you go.
Row 15: (Dec, sc 3) – 24
Row 16: (Dec, sc 2) – 18
Row 17: (Dec, sc 1) – 12
Row 18: Decrease around – 6
Finish stuffing, FO, and sew shut.
Arms & Legs (Make 4)
With dark brown make a MR. (If preferred, you can begin with off-white and switch to dark brown after the first row.)
Row 1: Sc 6
Row 2: (Inc, sc 1) around – 9
Rows 3-8: Sc around
FO, stuff, and attach to body.
Ears (Make 2)
With dark brown make a MR.
Row 1: Sc 6 – 6
Row 2: Inc around – 12
Row 3: (Inc, sc 1) around – 18
Fold in half and single crochet closed. Attach ears to head slightly curved (mine reach from row 2 to row 8).
Tummy Patch
In off-white make MR.
Row 1: Sc 6 – 6
Row 2: Inc around – 12
Row 3: (Inc, sc 1) around – 18
FO and attach to body (The bottom of the tummy patch should hit around row 6 on the body).
Face
In off-white make MR.
Row 1: Sc 6 – 6
Row 2: Inc around – 12
Row 3: (Inc, sc 1) around – 18
FO, embroider mouth and nose w/ black yarn, and attach to the head. This should be placed about 1 row below the eyes.
And that’s it! Your very own Sampson. If you see any errors in the pattern, or have any questions or suggestions, please let me know!
Rachel
**This pattern is for personal use only. Finished products may be given as gifts but, please, do not sell them.**


