Sandy the Sea Dragon

I got to test a pattern! Yay!

I haven’t had the chance to do this for anyone in a while (I did try but the slots filled up QUICK). I’m always making and re-making my own patterns/designs, so following someone else’s pattern is a nice change!

This time around I had the pleasure of testing the Sandy the Sea Dragon pattern by Emma at Emma Crafts Designs. This pattern was tested by myself and three others. We all finished our projects by the first weekend, I believe.

I think that one of the best things about having others test your patterns is seeing the different colors people choose for their project! For this amigurumi, for example, all four of us chose different colors for our main color: green (mine), black, red(dish), and blue!

To be honest, we hardly had to do any pattern changes because it was already almost perfect! I was able to suggest a minor edit involving the tail fins which made it slightly more efficient. 🙂

Thank you so much, Emma, for letting me test your pattern!

You can find the final pattern for sale on Ravelry! Enjoy!

c2c Project: Texas State Flag – Mario Bros. Style!

Happy New Year!

A little late, I know, but I still wish you all the best!

I’ve been a little absent on here (as per usual), so I plan on making a couple different posts with updates in them. This first post is the biggest project I’ve finished since we last met: The Mario Bros. Texas State Flag!

Ta-da!

I made this mini afghan for a friend of ours as a housewarming/Christmas present. It wasn’t always going to look like this though! Originally, I was going to make the Texas State Flag or a longhorn. We (my husband and I) decided on the state flag and I began to map it out.

Like my c2c Galaga afghan – which I’ve yet to finish –  I plotted it out using Stitch Fiddle. The red, white, and blue part was easy enough to plot out but I had no idea on how to go about making the pixelated star. I searched online for an image and the only one I could find was the Mario Bros star! I mentioned it to my husband and another friend of mine and it was unanimous – use the Mario star! It was especially fitting since our friend is a gamer and we thought this would be perfect for his new game room!

It took a little longer to make than I expected it to. When I started the afghan, I think around the first week of December, I was really sure I was going to be able to finish it by the weekend. I started at the bottom right corner and knew the red and white portions would go by really quick! While this started off well enough, life got in the way as it usually does. I had very little time to work on it since it can be a bit difficult to work on such a large project with two small children running around trying to hurt themselves (crazy kids). Aside from that, we had a very bad case of the Mondays on the 11th.

You know how they say bad things come in 3s? Well, that Monday it did. To start it all off, I woke up sick (I ended up being sick for almost all of December). Around noon, we headed out for lunch and shopping. When we returned home we noticed that we were in the process of getting a flat tire and found a huge screw in our tire. How do these things even get in there?! (That reminds me – we still need to bring that tire back to Costco…) And the third, and final, thing that day was:

I slipped on the stairs.

While carrying my 16-month old.

Ugh.

We’re all okay now. The baby was uninjured (but it took us about an hour to figure this out. We think he was just really scared.) Luckily, I just fell straight onto my buns and only fell about two steps down. I did hit my back pretty hard on the step behind me but nothing broken! Needless to say, I was a bit uncomfortable for the next few days.

Anyway, you get the idea. Life interrupts your crochet time. Ha! Once I got back into crochet mode I was hard at work on this blanket and any Etsy orders I had at the time.

But again, it took longer than expected because I MESSED UP! (-_-)

I sped through the remainder of the blanket and finished it. But, as we were getting ready to pack it up, I noticed that there was an extra pixel (square) in the star! Nooooo! You can see it here in my finished blanket photo (minus weaving the ends):

Do you see it? Second row at the top of the star. There should only be two squares/pixels – not three!

What’s funny is that when I sent the picture to my husband he thought that something looked off, but he was looking at a different spot of the star. He was more fixated on the arms of the star which are different due to the stitching but that’s just how c2c works and can’t be changed.

I had to frog about 20 rows just to reach the part I needed to fix. I thought that this setback was going to take me FOREVER to fix and that our shipment was going to be pushed back several days. All in all, it only took me an afternoon to finish it up and that included having to frog it AGAIN because I messed up on the star. AGAIN. What is wrong with me?! I can’t even follow my own pattern…

How far I had to frog it.

The fixed star (and toys).

In the end, it turned out perfect and we sent it out a few days later. I’m really pleased with how it turned out and our friend seemed happy, too! It was funny though… about halfway through we thought, “You know what? He’s either going to love it or be really offended!” We were a little worried while we waited for it to arrive, to say the least. But it arrived safely, along with some other gifts, and was well liked. Phew! (At least, that’s what I was told. Who knows? Maybe he hates it.)

There you have it! My biggest project from this winter. What do you think?

🙂

The Lin Lin Beanie

Hello, friends!

So, I made a thing.

Well, that’s nothing out of the ordinary – I make a lot of things! But this time I made a beanie with more than just the usual single crochet and double crochet. I even used a stitch that I didn’t know the name of but had used in another pattern once upon a time (I have since found out that it is called “crossed double crochet” or “XDC” thanks to @acassafrass on Instagram)!

The Lin Lin Beanie

First off, grab your tools.

Oh… Uh. Not those tools (although that ruler could be useful). These tools:
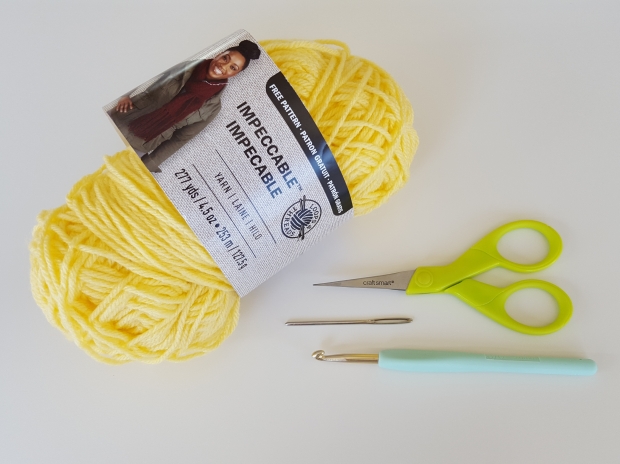
You will need:

  • Yarn of your choice (I used Impeccable Loops & Threads in “Butterscotch“)
  • Size H (5mm) hook (I got this one from Daiso and I love it!)
  • scissors
  • yarn needle

Special Stitches:

Crossed Double Crochet (XDC) – skip the first stitch, DC into the next, then DC into the skipped stitch. This makes an “X.” Click the link mentioned above for visual instructions or view photos included in the pattern.

Let’s begin!

With yarn of your choice, start with the magic ring and chain (ch) 2 – ch 2 counts as the first double crochet (dc).

Row 1: Double crochet 9 stitches, attach with a slip stitch (sl st) to the starting chain, and chain 2 – 10

Row 2: DC into the same stitch as the chain 2 (counts as the first increase), increase (inc) around, attach with sl st, and chain 2 – 20

Row 3: DC into same st as chain 2, DC into the next st. (Inc, DC 1) around. Join and chain 2 – 30

Row 4: DC into same st as chain 2, DC into the next 2 sts. (Inc, DC 2) around. Join and chain 2 – 40

Row 5: DC into same st as chain 2, DC into the next 3 sts. (Inc, DC 3) around. Join and chain 2 – 50

Row 6: DC into same st as ch 2, DC into the next 4 sts. (Inc, DC 4) around. Join and chain 2 – 60

Row 7: DC into same st as ch 2, DC into the next 5 sts. (Inc, DC 5) around. Join – 70

You may need to add another row to your base – my head is on the smaller side so this fits me fine. If you need to size up, repeat the above step but change the DC 5 to DC 6 making it a total of 80 stitches.

Now that we’ve finished the base of the beanie, we’ll start with the main part of the pattern. The next two rows will be repeated until your desired length.

Row 8: Chain 2 (this does not count as a stitch). Work XDC throughout the row (see note above).

(Note: for the very first row of XDC, you’ll skip the stitch with the join and DC in the next stitch. Then DC in the joined stitch.This is the only row you’ll do this). Join with sl st to the starting chain. – 70

Row 9: Chain 1 and work half double crochet (HDC) throughout the row. Attach with a sl st to the chain 1. – 70

Repeat Rows 8 & 9 until you reach your desired length. When you reach that point, you will add 3 additional rows of HDC for your brim.

For this beanie, I repeated the rows 5 more times.

20170929_124911.jpg

For the slouchy beanie I made previously, I repeated the rows 9 times.

You can make this as long/short as you want! Also, if you don’t care for the HDC brim, you can use another method (ribbed brims seem to be popular right now). If you have any questions, or find a mistake, feel free to contact me!

If you happen to make one of these beanies, I’d love to see it! Please link back to my blog or tag me on Instagram @pleasantplushies. I’ve also added this pattern to my Ravelry page.

Enjoy!

Rachel

Progress – Galaga c2c Graphgan

I’ve officially finished the first two panels to my Galaga afghan with all the ends weaved in!
First, I finished the ship:

IMG_20170717_092112_498

Up next, I made the moth:

Source

I’d have liked to make it white, red, and blue, but my hubby wanted it to be as close to the original as possible so grey it was (although I already changed it up by making the ship white!). The grey actually looks really good in the final panel.

We’re still trying to figure out which other ships and enemies to use. We went to Michael’s the other day to find yarn for this project but ended up leaving empty-handed! We couldn’t find a good enough color for one ship (we need to check JoAnn’s) and I already have a lot of the other colors. No new yarn for me! 😣 That’s okay… I have so much. I need to use up some of my stash!

I think I’m making the bee next.

Click for source

On to other things!

I also completed my custom Dunsparce! It turned out so nice. I found a really pretty light turquoise (Red Heart Baby Steps in Aqua) at Michael’s, bought it, and sent a picture to the customer asking if it would work (I asked 3 different people their opinions so I was hoping!). They loved it so I got to work! Here is the completed Dunsparce:

I love how it turned out! So pretty with the light blue and pale yellow! 😄

 After finishing this, I had some downtime and decided to take part in Knot Bad‘s #knotanoddish fun! The objective was to turn another character/animal/person into an Oddish using his Oddish pattern. As soon as I saw this, the first thing I thought of making was a Jigglypuff! Here’s what I made:

So… It wasn’t until I finished that I realized the ends of Jigglypuff’s ears are NOT black. I was making it based on memory and, apparently, my memory is not that great. For whatever reason, I was thinking that Jigglypuff had Pikachu-like ears. 

I don’t know why…

Oh, well.

That’s all for now. We’ve had company over for the last week so I haven’t done much crocheting. Hopefully, I’ll get to my next Galaga panel soon! 😄

Have an AWESOME weekend!

My First c2c Project!

Have you been a part of the c2c craze yet?

I tried it out a few months back to test it out and it is so easy to do! I started using up some Lily & Cream yarn that I had lying around with the hopes that I could use it up and make something from it. I used all that I had, but I only ended up making a couple squares. I then decided to use some old yarn from a frogged blanket and made some squares with that (pictured below) which I still have tucked away under our coffee table. While it was a neat method, I was never motivated enough to make an entire afghan or anything else for that matter.

Until now!

We have a cocktail arcade cabinet upstairs in our game room, and recently my husband has been playing it semi-frequently. One of his favorite games to play is Galaga and I decided that I’d like to make something special for him to compliment the game room. My plan is to make a c2c afghan (or graphgan, if you will) of the ship(s) and some of the enemies/bosses. I’m not planning on making it huge – just big enough to cover someone sitting on the couch.

(Side note: while searching for the Galaga wiki, I noticed that IGN gave it a 3/10 Haha!)

When I first started planning out the graphgan, I figured I would only need to use about six different panels to make the blanket big enough. My panels are going to be 17×18 “pixels” each which seem to measure out approx. 3/4″ per pixel. I am halfway done with my first panel and am thinking I may need to add two more panels to the blanket to make it a decent size since the width is only a little over a foot. But only time will tell. Maybe after the first panel is done I can get a better idea of what I’ll need to do.

Halfway there!

To design/plan out my graphgan I am using the website Stitch Fiddle where you can create your own crochet/knitting patterns, cross-stitch, charts, etc. I have made my 6 charts public if you happen to be interested. For reference, I also have the webpage for One Dog Woof’s c2c tutorial open so I can remember what I’m doing (sometimes my mind blanks haha).

What are your thoughts/opinions on the c2c method? Do you like it? Hate it? If you’ve finished a c2c blanket, or anything else with c2c, I’d love to see it! 

Enjoy your weekend! I’ll be weaving in ends. 😉

Busy as a Bee

Okay – not really. 

But I made a bee! 🐝

It was a really quick workup and I’m really happy with how it turned out. Although, it does have some jogging (is that the right term?) under the body which I don’t much care for. I’ll have to go back and review the seamless jog tutorial… but I love it anyway!

I’m in the process of making a custom Dunsparce, but I need to make a trip over to Michael’s or Jo-Ann’s. The customer would like the blue I usually use to be a lighter turquoise or “pastel blue.” I was hoping I had something that would work in my stash so I wouldn’t need to go out (lazy!), but I only had two other shades of lighter blues. With my fingers crossed I made up two swatches to see if they might work and sent them for approval.

I thought the bottom blue looked really pretty against the pale yellow but they’d like a lighter version of the top shade. Dang.

But that’s okay – I really need to get out of the house anyway! This past weekend was spent potty training my 3-year-old so we couldn’t go anywhere since we had to get him to sit on the potty every 20 min. At the time of writing this post (Monday), he still won’t sit on the potty when he feels the need, but won’t make too much of a fuss when we tell him it’s time to use it. Hopefully he gets the hang of it soon so we can go places! 😐 

My MIL is coming by in the morning (Tuesday) and I’m hoping (🤞) that she’ll offer to watch him for a bit so I can make a run out. I’ll even offer to bring the baby! Until I grab some new options I’m at a standstill for prepping this guy. I’ve made everything I could that didn’t have the blue on it. 

I hope I can find something nice!

Make Over – Alpaca to Llama

Time for a new Make Over post!

This time around it is my alpaca pattern. I don’t recall if I ever posted about my alpaca on my blog, but I wrote this pattern back in 2013. That’s the same year I opened my Etsy shop and, at the same time, I was really into doing the monthly challenges in one of my Ravelry groups, Amigurumi Army. The theme at this time was fiber, so that meant we could make anything you could get fiber from such as llamas, sheep, alpacas, etc.

Also at this time I had just purchased the newest Harvest Moon which came (unbeknownst to me) with an alpaca plushie when purchased from GameStop. Typically, I don’t shop at GameStop because I hate their guts don’t care much for them, but I stopped by on whim to pick up this game. Luckily, they still had a few copies (and alpacas!) left and I was able to get my hands on ’em. Anywho, I attempted to make an alpaca similar to the plushie but wasn’t able to get it quite right. However, I still thought it was really cute and ended up listing it in my shop. Here’s what I ended up with:

Alpaca 1

I actually ended up selling it within a few weeks! This came as a shock to me because many listings end up being renewed at least once before they sell for the first time! I never made another one but had the pattern written down in my handy dandy crochet book (it’s one of the first few that I wrote in that notebook).

I probably wouldn’t have made one again, but a friend of mine recently asked me if I’d ever made a llama before because she is collecting llama items for a niece due in December. I told her I had made an alpaca and that it could probably pass as a llama (hehe) but I was willing to try to change it a little bit to make it more llama-like.

I’m no llama or alpaca expert (I know there are many differences between the two) but I know that one of the defining differences between the two are the ears. Alpacas have smaller more spear-like ears while llamas have long banana-like ears. So, I adjusted the ears from my pattern (which needed to be changed anyway. Yeesh!) to make them longer and more… floppy.

20170703_141746

(Excuse my messy countertop)

Aside from the ears, I kept the rest of the pattern pretty much the same! In hindsight, I probably should/could have made it in another color (like brown) but my friend was okay with the white. Woo hoo!

Okay, okay.

So this is BARELY a make over. But I don’t post on here often enough and needed some new material. 🙂

Have a great week! ❤


PS – You may have already seen pictures of the llama on my Instagram. If you’re not following me yet, come find me! @pleasantplushies

A Whacka for my Bro

Finally – something new!

If you’ve been following me at all on my new Instagram (check sidebar for a link –>), you’ll have watched  my  attempt at crocheting a Whacka for my brother.  If you aren’t familiar with the oh-so-cute Whacka, here’s a picture:


whacka

(The source for this is in a previous post, but you can find more info here)

 I don’t know why I didn’t crochet one sooner – it’s super easy to do! The only thing I had an issue with was deciding whether or not I should attach his rocks to his body or just leave them lying flat next to him. So, here’s my question for you, dear readers:

Better 1? or 2?

I was going to leave the final answer to my brother; however, he left Whacka here after his recent visit so I got to mess around with it some more (honestly, I don’t think he realized it was for him – what a goober). At the time, he said that the flat rocks around Whacka were fine, but he may have just been saying that so I didn’t have to do any more work which is all fine and dandy, but not necessarily helpful. I don’t want to just settle on it, because eventually I want to list it! It’s been a while since I’ve added anything new to the shop (I still haven’t finished that ladybug!) and I’d like to up my inventory. Let’s be real – it can get a little tedious crocheting the same items over and over and over again. Not that I’m complaining. Well, maybe.

So, what do you think? Attached or no?

 Happy Sunday!

Follow me on Instagram!

Hey, all! Happy Sunday to you!

I recently created an Instagram account for my blog and I’d love for you to follow me! I promise not to bombard you with pictures of my kids (that’s what my personal account is for)! 😉

I only have a few posts up at the moment, but have been pretty good at posting something once a day. I’m trying to use it as motivation to create more plushies/inventory. At the moment you can see my progress on this guy:

I’m not sure if I’m finished with him yet. He’s for my brother (who’s visiting us this weekend) so I’ll ask his opinion when he gets here. But I’m also looking for input from you guys! Any suggestions are always welcome. 😁

If you have Instagram, and you’d like to follow me for updates and other fun stuff, feel free to follow me! My username is – you guessed it! – pleasantplushies.

I hope to see you on there! 

PS: in case you were wondering about the Kickstarter I mentioned last time, it was fully funded with 3 days to spare! Woo hoo! I can’t wait to see what Vickie and the gang come out with! 😎

The Knit Show

Hey, all!

You may have seen this around the interwebs, but Vickie Howell has a Kickstarter going on for a new knitting show:

Vickie & Co are currently at 80% of their goal with 6 days left! Let’s make this happen! ❤

For those who’d like more information on this Kickstarter, please click here or scan the QR code above.