Kirby & Bronto Burt

Leading up to my oldest son’s birthday in June, I began to make a few smaller amigurumis. If you’ve followed me for a while, you may have noticed that I tend to make rather large plushies and I wanted to switch things up a bit.

I’ve started to use a 4mm hook instead of my usual 5mm hook to see the differences between the sizing and stitch gaps. I’ve also had plans to make smaller versions of my plushies just so it won’t take as long to create! But I haven’t done that yet.

Anywho, my husband and son had just recently finished Mario 64 (the camera angles in that game make it hard as balls – no joke) and were trying to find a new game to play together. My husband decided to test out Kirby 64: The Crystal Shards. Unfortunately, the gameplay was a little too complicated for my (now) 4-year old and he was too frustrated to play.

BUT.

While they were playing, I decided to whip up a little Kirby for him to play with. I made this one with a 4mm hook and did it freehand (I have a pattern for a larger one, but I thought a small one would be cute). After I made him, I decided to make a Bronto Burt!

Aren’t they so cute?

The little Kirby is all cute and squishy. Bronto Burt was also made with a G hook but turned out a bit larger! Apparently, one of my G hooks was a 4mm, which I assumed ALL G hooks were, but the other one was 4.25mm! Whaaat? (I feel like I knew this at one point but forgot.) I was a little bummed to find this out, but they both turned out so adorable so I can’t be mad!

Here’s what happens when kids are around and you’re trying to take pictures:

Baby spoons!

As I mentioned before, I was in a mini plush phase, so I also whipped up a little Bob-omb as well! For the most part, the mini Bob-omb was also made freehand but I did use some of my usual Bob-omb pattern. I think the main changes were his feet and eyes.

What a cute, little trio! 🙂

I think that Bronto Burt is a little bit underrated. He’s so dang cute AND he’s one of the first enemies you’ll see in Kirby games! He needs some love, too! ❤

Katie – Animal Crossing

Here it is! Another one of my summer projects: Katie!

If you don’t recognize this cute little kitty, this is Katie from Animal Crossing. I believe she’s been in all of the AC games (except maybe Happy Home Designer). In one game, you’ll find her near the train station looking for her mother. In another, you’ll meet up with her after returning from another town and she’ll wander around town with you!

Back in May, which is when I crocheted her, she had a garden event in Animal Crossing: Pocket Camp. If she’s had any more since then I am unaware as I haven’t played recently (I should get back to it). She’s such a cute little kitty and I just had to make her!

I just love the little details such as her hair and her little hat! I also did her ears a bit differently than I do my usual ones. I think they turned out purrfect! Heh.

I also gave her a little backpack to carry her things around in. Well, it’s really more of a tote bag since I couldn’t figure out how to make a working backpack. But it slips right over her little arms!

Well? What do you think? I may be biased, but I think she’s adorable. Unfortunately, a lot of people I showed her to couldn’t remember who she was.

But you remember, don’t you? I’m not the only one who likes her… am I?

Until next time!

Katie is available in my shop as made to order. At the time of this posting, I have one ready to ship! 🙂

c2c Project: Texas State Flag – Mario Bros. Style!

Happy New Year!

A little late, I know, but I still wish you all the best!

I’ve been a little absent on here (as per usual), so I plan on making a couple different posts with updates in them. This first post is the biggest project I’ve finished since we last met: The Mario Bros. Texas State Flag!

Ta-da!

I made this mini afghan for a friend of ours as a housewarming/Christmas present. It wasn’t always going to look like this though! Originally, I was going to make the Texas State Flag or a longhorn. We (my husband and I) decided on the state flag and I began to map it out.

Like my c2c Galaga afghan – which I’ve yet to finish –  I plotted it out using Stitch Fiddle. The red, white, and blue part was easy enough to plot out but I had no idea on how to go about making the pixelated star. I searched online for an image and the only one I could find was the Mario Bros star! I mentioned it to my husband and another friend of mine and it was unanimous – use the Mario star! It was especially fitting since our friend is a gamer and we thought this would be perfect for his new game room!

It took a little longer to make than I expected it to. When I started the afghan, I think around the first week of December, I was really sure I was going to be able to finish it by the weekend. I started at the bottom right corner and knew the red and white portions would go by really quick! While this started off well enough, life got in the way as it usually does. I had very little time to work on it since it can be a bit difficult to work on such a large project with two small children running around trying to hurt themselves (crazy kids). Aside from that, we had a very bad case of the Mondays on the 11th.

You know how they say bad things come in 3s? Well, that Monday it did. To start it all off, I woke up sick (I ended up being sick for almost all of December). Around noon, we headed out for lunch and shopping. When we returned home we noticed that we were in the process of getting a flat tire and found a huge screw in our tire. How do these things even get in there?! (That reminds me – we still need to bring that tire back to Costco…) And the third, and final, thing that day was:

I slipped on the stairs.

While carrying my 16-month old.

Ugh.

We’re all okay now. The baby was uninjured (but it took us about an hour to figure this out. We think he was just really scared.) Luckily, I just fell straight onto my buns and only fell about two steps down. I did hit my back pretty hard on the step behind me but nothing broken! Needless to say, I was a bit uncomfortable for the next few days.

Anyway, you get the idea. Life interrupts your crochet time. Ha! Once I got back into crochet mode I was hard at work on this blanket and any Etsy orders I had at the time.

But again, it took longer than expected because I MESSED UP! (-_-)

I sped through the remainder of the blanket and finished it. But, as we were getting ready to pack it up, I noticed that there was an extra pixel (square) in the star! Nooooo! You can see it here in my finished blanket photo (minus weaving the ends):

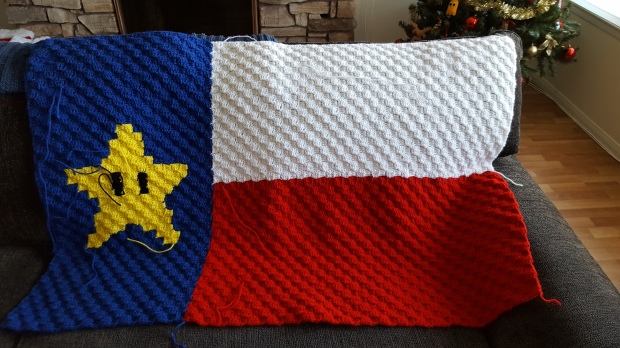
Do you see it? Second row at the top of the star. There should only be two squares/pixels – not three!

What’s funny is that when I sent the picture to my husband he thought that something looked off, but he was looking at a different spot of the star. He was more fixated on the arms of the star which are different due to the stitching but that’s just how c2c works and can’t be changed.

I had to frog about 20 rows just to reach the part I needed to fix. I thought that this setback was going to take me FOREVER to fix and that our shipment was going to be pushed back several days. All in all, it only took me an afternoon to finish it up and that included having to frog it AGAIN because I messed up on the star. AGAIN. What is wrong with me?! I can’t even follow my own pattern…

How far I had to frog it.

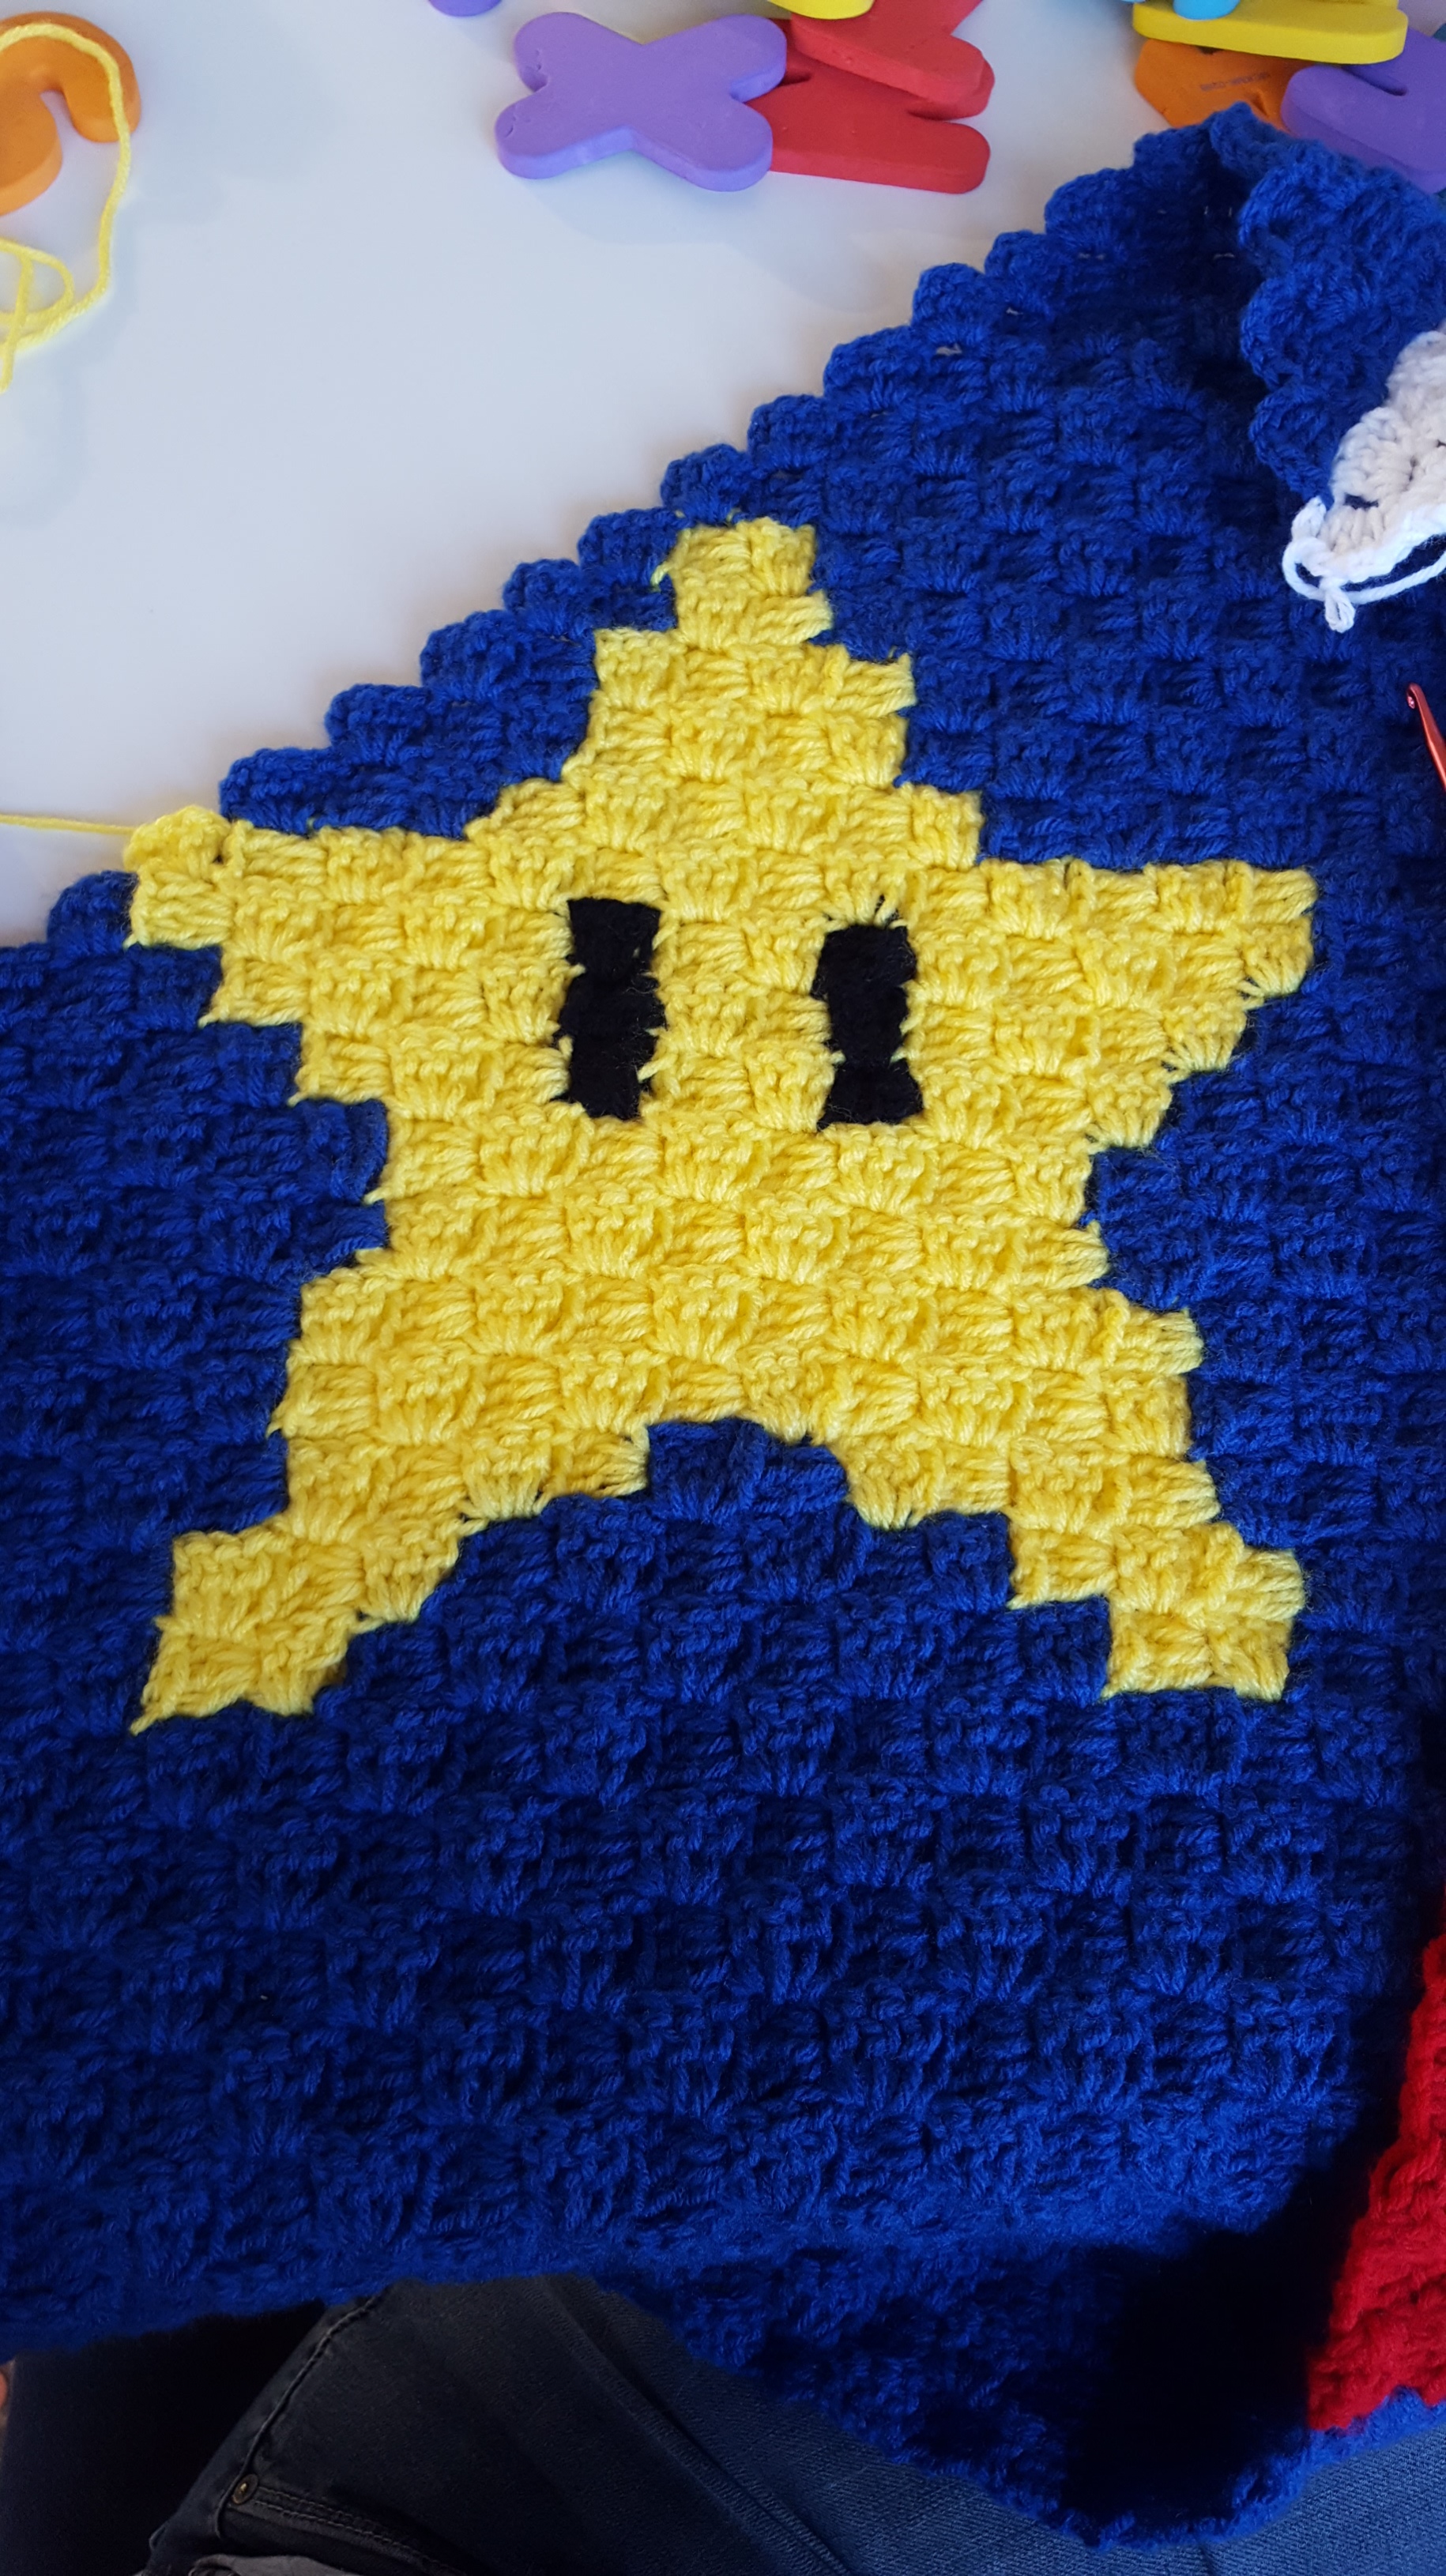
The fixed star (and toys).

In the end, it turned out perfect and we sent it out a few days later. I’m really pleased with how it turned out and our friend seemed happy, too! It was funny though… about halfway through we thought, “You know what? He’s either going to love it or be really offended!” We were a little worried while we waited for it to arrive, to say the least. But it arrived safely, along with some other gifts, and was well liked. Phew! (At least, that’s what I was told. Who knows? Maybe he hates it.)

There you have it! My biggest project from this winter. What do you think?

🙂

A Whacka for my Bro

Finally – something new!

If you’ve been following me at all on my new Instagram (check sidebar for a link –>), you’ll have watched  my  attempt at crocheting a Whacka for my brother.  If you aren’t familiar with the oh-so-cute Whacka, here’s a picture:


whacka

(The source for this is in a previous post, but you can find more info here)

 I don’t know why I didn’t crochet one sooner – it’s super easy to do! The only thing I had an issue with was deciding whether or not I should attach his rocks to his body or just leave them lying flat next to him. So, here’s my question for you, dear readers:

Better 1? or 2?

I was going to leave the final answer to my brother; however, he left Whacka here after his recent visit so I got to mess around with it some more (honestly, I don’t think he realized it was for him – what a goober). At the time, he said that the flat rocks around Whacka were fine, but he may have just been saying that so I didn’t have to do any more work which is all fine and dandy, but not necessarily helpful. I don’t want to just settle on it, because eventually I want to list it! It’s been a while since I’ve added anything new to the shop (I still haven’t finished that ladybug!) and I’d like to up my inventory. Let’s be real – it can get a little tedious crocheting the same items over and over and over again. Not that I’m complaining. Well, maybe.

So, what do you think? Attached or no?

 Happy Sunday!

Make Over – Meat Boy Case

Howdy, y’all!

Today’s Make Over is about the Meat Boy DS case I made a while back. To refresh your memory (since it’s been almost 2 years!), here’s a picture of it:

Meat Boy DS Case

I originally made this to cover my 3DS but I never really liked it that much (let’s be real – it’s a little weird). So, it was placed inside my small box of finished items that I tend to forget about.

UNTIL NOW!

My husband was actually the one to remind me about it. About a month or so ago he picked up where he left off in Pokemon Blue (Or was it Red..?). Not important – but it’s from when he was 18! Anyway, since he was playing a  Gameboy game, he needed to use an older device. He didn’t want to carry around the massive OG Gameboy so he settled for the Gameboy SP. He realized that he doesn’t own a carrying case for it and asked if I had anything available or if I could make him one. Then he remembered I had made this wonky DS case and he wanted to see if it fit (width-wise, obviously). So, we journeyed to the Island of Misfit Toys – I mean, the box of crap – I mean, the box of finished items! and pulled this bad boy out.

Since the case was much too long for an SP, my husband suggested I tear out half of it to get to the appropriate size. He also requested that I have the button on the backside so the front just had Meat Boy’s cute little face.

He also suggested I make a Bandage Girl for our other SP! Haha!

Are you interested in seeing the play-by-play? No? Tough! Here it is anyway:

First off, I needed to see just how much needed to be removed. It was a good 2-3 inches!

Next came the unraveling!

Ewwww it looks like braaaaiiiiinnnsss!

Next, I made the loop on the front side instead of the back and attached the button.

Annnnnnnnnnnd all done!

Perfect fit! And Meat Boy looks much better! 🙂

What do you think? Better, right? His face could probably use a little update, but whatevs.

I like it!

Have a great weekend!

And Happy Anniversary to my husband and me! ❤

Smooches!

It’s Moo and Mootwo!

cows-1

…see what I did there?

Heh. Heh. Heh.

I just finished up an Etsy order for BOTH of my Harvest Moon cows. I love making these guys – they are just too cute!

I took the chance to take a couple of new photos of them since the ones in the listings were a bit old and dark. Unfortunately, I took them at different times of day and you can totally tell. The  SNES cow was taken early in the morning which, I figured, would be the best time since the sun shines right into our kitchen window. However, it made it cast a bit of a shadow and is just a little too bright:

snes-hm-cow-6

SNES Harvest Moon Cow


For the other cow, I took the photos in the late afternoon which turned out to be a much better time. It was still pretty bright outside and I didn’t get as much of a shadow. I also used the blanket I’m working on as a background!

hm-cow-8

Harvest Moon Cow

Huh. Actually, I guess this one’s brighter than the other! Hehe. But it shows off the colors nicely.

Those little cutie pies! 😀

Happy Sunday!

Rachel


Check out our other Harvest Moon items here!

New Listing – Poochy

Oh my goodness!

Due to the recent release of Yoshi’s Woolly World, my post about Poochy has been visited so many times! Most of my visitors have been referred from reddit, so it kind of makes me feel like a celebrity! Haha!

I have been having many requests to make Poochy, so I decided that it is a good time to test out my pattern and list it in my shop!

New Poochy Collage

Check out the new listing here!

🙂

Oh, and Happy Birthday to me!

What’s the Big Spheal?

Yay! I finished something else!

I guess working on that crocodile motivated me to start crocheting again. Let’s see how long it lasts…

It also helps being a member of a Ravelry group focused on Pokémon! The May CAL (crochet along) was water type Pokémon and, even though I missed it by a few days, I felt the need to participate in this one.

One of the Pokémon on my mental to do list was a Spheal. They are just so cute and round!

20140604_110603 20140604_110615

20140604_110702 20140604_110743

One of the other Ravelry groups I am a member of may be doing a Pokémon themed CAL this month, too. Basically, I am killing two birds with one stone. Well, maybe 3 birds since this will also be added to my Etsy inventory as well. 🙂 And if they decide we aren’t doing Pokémon after all, well, I’m still glad I made it.

I think it turned out great! But that’s just my opinion. I saw a pattern or two available online for a Spheal but I really wanted to make my own. Some of them just didn’t have the right look or not enough detail to them.

Oh, yeah. As I mentioned before, we are preparing the baby’s room and we finished a bit more on Monday. My husband and his dad put up the ceiling fan/light (finally!) and they also attached the baseboards. You can see the new baseboards in the top two photos. 🙂 Much better than our old ones! All we need now is some furniture!

Happy Hump Day!

Do Over! (Part 2)

Welcome back!

Last time we met I said that I was going to revamp my Shy Guy pattern.

Before I even began I found issues with it! First of all, I only wrote down the pattern for the body, the base (which covers the bottom), and the face. But the face is only the white part– no eyes or mouth (not that the mouth is hard to figure out). You and I both can tell, just from looking at it, that there aren’t only 3 pieces!

Yup. More than 3 pieces.

Yup. More than 3 pieces.

So, yeah, I am missing parts of my Shy Guy. Oh, the incompetence!

Another thing I noticed before starting is that when I was making a note of using the “Magic Ring,” I used the abbreviation “AR.” Um… AR? What? Why would I put that? Automatic Ring? Awesome Ring? I don’t know. Weird.

Alrighty! Enough observations. Let’s get down to it!

Here’s what I did:

  • Edited pattern – typos, labeling, better format
  • Added arms, eyes, feet, and band to pattern
  • Made his eyes smaller – I didn’t realize the Shy Guy eyes in Mario Bros 2 were so small! Good thing I added that image in my last post. =)

Drumroll, please! Dum da da DA!

New and Improved!

I am so so so happy with how he turned out! As I was going along with my modifications and construction I started feeling  a bit concerned. But it all turned out in the end!

Assembly & Comparison

Assembly & Comparison

What do you think? Better than my first?

Until next time,

Rachel

Do Over! (Part 1)

Happy Tuesday!

My latest project is to recreate an amigurumi that I made last year. It was one of the first patterns that I made out on my own which I (tried) to take fabulous notes on. We’ll see how good they actually are and, hopefully, I can make a few adjustments to it.

I will be testing out my Shy Guy pattern. It is based on the Shy Guys from Super Mario Bros. 2. This is the one:

Shy Guy

Notice he has white shoes and not blue ones. The reason I picked this Shy Guy originally was because I didn’t have any blue yarn that would work! Actually, I still don’t think I have any…

Anyway, this is what mine came out as:

Shy Guy 1 Shy Guy 2 Shy Guy 3

Altogether, I was very pleased with my Shy Guy at the time. But even though I liked him, he never made it to my Etsy store. Something was wrong with him. He need some… revamping?

First off, his feet are just white triangles. At the time, I had not made very many feet so I was still new at it. Now I have my own way of making them and plan to use this method.

Second… I dunno… I just feel the need to make it all over again and finally type out the pattern and add to my collection.

So, without further ado… let’s get crackin’!

Stay tuned for part 2!*

Rachel

*This was not intended to be a two part post. I was all set to work on this but I ended up having to work on something else. =)